Wednesday, June 18, 2014

Rose Granny Square - Pattern

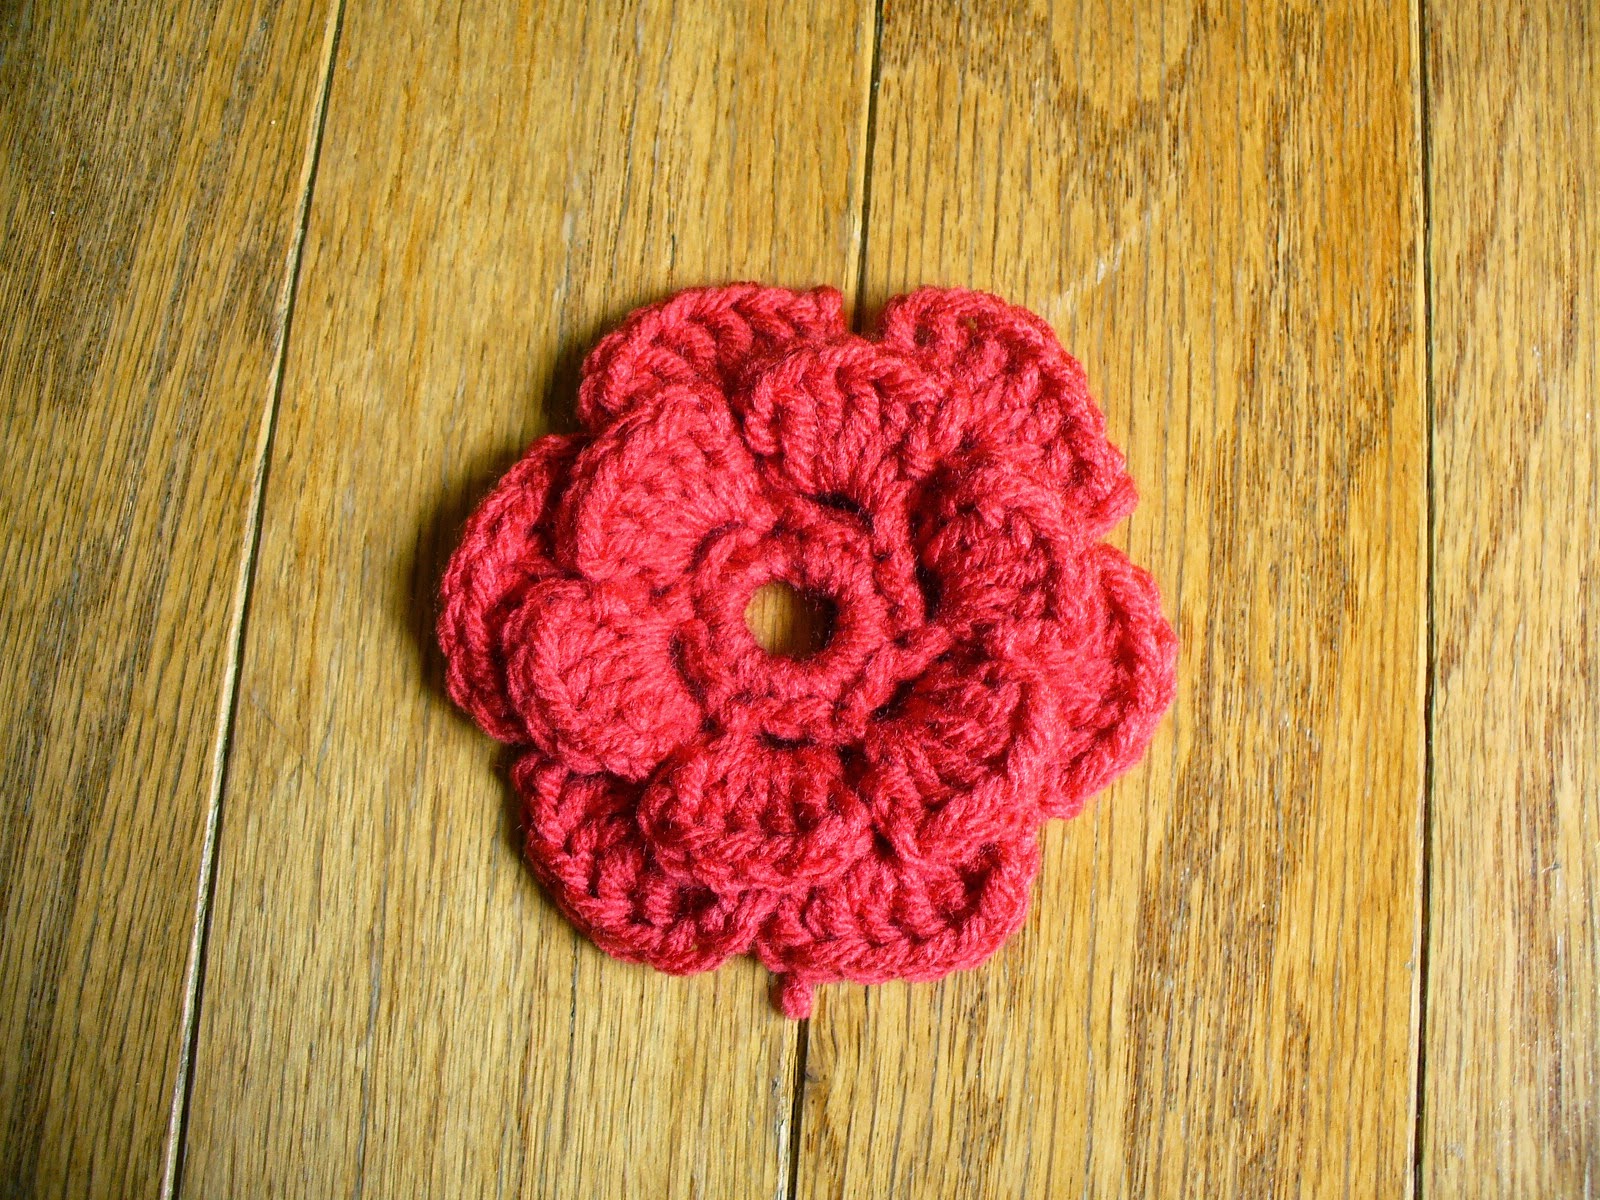
We have roses blooming in our backyard that are a pretty pink red. I love looking at them. I've been looking for a pattern for a rose square, something simple. I had been having trouble finding just the right one (though I found a number of other squares that I love). I was looking at one of my favorite blogs and found something really close. I made it, but it wasn't quite there yet. So I made some changes.


This is what I came up with. The original pattern came from Alexis at Persia Lou and her Flower Hexi Baby Afghan. I changed the placement of the back petals to make it look more like a rose. Alexis also made her pieces hexagons. I wanted to have squares as I am thinking of making these into a pillow. Below is both as squares so you can see the difference. My version is on the left and Alexis' on the right.

I made enough changes, that I thought I would post my version of the pattern. But go check out the original because Alexis' baby blanket is beautiful.

Materials:
Worsted weight yarn, two colors
Hook I (5.50 mm)
Yarn Needle

Abbreviations:
ch - chain
sl st - slip stitch
sk - skip
sp - space
sc - single crochet
dc - double crochet
trc - treble (triple) crochet

with first color
ch 6, join with sl st to first ch to form ring


R1 - ch 1, sc 12 into ring, sl st in first sc


R2 - ch 1, *sc, ch 2, sk 1* x 6, sl st in first sc


R3 - ch 4, sl st in first sc, in ch 2 sp [sc, ch 2, dc 4, ch 2, sc], *sl st in sc, ch 4, sl st in same sc, in next ch 2 sp [sc, ch 2, dc 4, ch 2, sc]* Repeat * 4 more times, after final petal sl st in first ch 4 (6 petals, 6 ch 4)

first ch 4

ch 4, first petal, ch 4


R4 - ch 1, *in ch 4 sp [sc, ch 3, dc 5, ch 3, sc], ch 1 behind petal from previous round* Repeat in eah ch 4 sp, after final ch 1 sl st in first sc (6 petals, 6 ch 1)

ch 1 behind smaller petal


Fasten off

R5 - join second color at any ch 1 sp, sc in same sp, ch 3, sl st around post of middle dc of back petal (back to front like a back post stitch), ch 3, *sc in ch 1 sp, ch 3, sl st around middle dc, ch 3* Repeat * 4 more times, sl st in first sc


view from the back after R5

R6 - sl st in next ch 3 sp, ch 3 (counts as dc) dc 2 in same space, *in next ch 3 sp [trc 3, ch 3, trc 3], dc 3 in next 2 ch 3 sp* Repeat once more, in next ch 3 sp [trc 3, ch 3, trc 3], dc 3, sl st into 3rd ch of first ch 3 and fasten off, or do an invisible join


I prefer an invisible join. After the last dc cut the yarn and pull through the stitch. Thread your needle, skipping the ch 3 insert the needle back to front through top of the first dc, pull tight.


Insert the needle back into the last dc made through the back loop only and pull tight.


Ta da, invisible join


I haven't quite decided on a pillow for this or not. I still need to work on a solid square to go with it.


I would love to see any thing you make with this square and I hope you enjoy.


Happy Stitches!
Read More »

Thursday, June 12, 2014

Lovely Mermaid - Pattern

Another mythical creature for you. It's a lovely little mermaid. Did anyone else pretend to be a mermaid whenever you went swimming? I did. I loved the idea of my hair flowing through the water. I don't know that it really did, but I pretended so.


Materials:
Worsted Weight yarn, three colors
Crochet thread or embroidery floss for details
Hook G (4.00 mm)
stitch marker
yarn needle
stuffing

Abbreviations:
ch - chain
st(s) - stitch(es)
sl st - slip stitch
sc - single crochet
hdc - half double crochet
dc - double crochet
sc2tog - single crochet two together
fpdc - front post double crochet
bpdc - back post double crochet

Note:
Done in continuous rounds, place stitch marker in the first stitch of round, moving it up each round to mark the beginning of the round.

Fin
ch 4, sl st to first ch to form ring
R1 - sc 5 into center of ring, turn
R2 - ch 1, 2sc in each sc, turn (10 sts)
R3 - ch 3 (counts as dc), dc in first sc, dc, *2dc, dc* x 4, turn (15 sts)
Starting first fin point
R4 - ch 1, 2hdc, *fpdc, bpdc* x 3, hdc, turn (9 sts, 7 sts left unstitched)
R5 - ch 1, 2hdc, *fpdc, bpdc* x 3, hdc 2, turn (10 sts)
R6 - ch 1, sc2tog, *fpdc, bpdc* x 3, sc2tog, turn (8 sts)
R7 - ch 1, sc2tog, *bpdc, fpdc* x 2, sc2tog, turn (6 sts)
R8 - ch 1, sc2tog, fpdc, bpdc, sc2tog, turn (4 sts)
R9 - ch 1, sc2tog x 2 (2 sts)
R10 - ch 1, sc2tog
Fasten off


Go back to unstitched sts of R4 for second fin point
R4 - join at same st as last st of row, hdc in same st as join, *bpdc, fpdc* x 3, 2hdc, turn (9 sts)
R5 - ch 1, hdc 2, *bpdc, fpdc* x 3, 2hdc, turn (10 sts)
R6 - ch 1, sc2tog, *bpdc, fpdc* x 3, sc2tog, turn (8 sts)
R7 - ch 1, sc2tog, *fpdc, bpdc* x 2, sc2tog, turn (6 sts)
R8 - ch 1, sc2tog, bpdc, fpdc, sc2tog, turn, (4 sts)
R9 - ch 1, sc2tog x 2 (2 sts)
R10 - ch 1, sc2tog
Fasten off


Tail (continuous rounds)
ch 2
R1 - in 2nd ch from hook sc 4
R2 - 2sc in each st (8 sts)
R3 - sc around (8 sts)
R4 - *2sc, sc* x 4 (12 sts)
R5 - sc around (12 sts)
R6 - *2sc, sc 2* x 4 (16 sts)
R7 - sc around (16 sts)
R8 - *2sc, sc 3* x 4 (20 sts)
R9-11 - sc around (20 sts)
R12 - 2sc, sc 4* x 4 (24 sts)
R13-15 - sc around (24 sts)
R16 - *2sc, sc 5* x 4 (28 sts)
R17-18 - sc around (28 sts)
R19 - *2sc, sc 6* x 4 (32 sts)
R20-21 - sc around (32 sts)
R22 - *2sc, sc 7* x 4 (36 sts)
R23-24 - sc around (36 sts)
R25 - hdc around, sl st in first st to close
Fasten off and add stuffing

Sew on fin to bottom on tail


Body
For the first row of the body, you will be working into the back ridge of the hdc. This is not the back loop of the stitch but ridge behind the top stitches. This pushes the top loops out to form almost a seam look. It adds a little extra definition between the tail and body.

Change to flesh color, join in back ridge of hdc

R1 - sc around in the back ridge of hdc (36 sts)

  
R2-5 - sc around (36 sts)

To make the stars, you will need to change color back to tail color [TC] for a few stitches in the round as well as using the flesh color [FC]. I carried the color not in use behind the stitches. I did break off the TC each round.

R6 - [FC] sc 3, [TC] sc, [FC] sc 3, [TC] sc, [FC] sc 2, [TC] sc, [FC] sc 3, [TC] sc, [FC] 21 (36 sts)
R7 - [FC] sc 4, [TC] sc 3, [FC] sc 4, [TC] sc 3, [FC] sc 22 (36 sts)
R8 - [FC] sc 3, [TC] sc 5, [FC] sc 2, [TC] sc 5, [FC] sc 21 (36 sts)
R9 - Repeat R7
R10 - [FC] sc 5, [TC] sc, [FC] sc 6, [TC] sc, [FC] sc 23 (36 sts)
R11 - sc around (36 sts)
R12 - *sc2tog, sc 7* x 4 (32 sts)
R13 - *sc2tog, sc 6* x 4 (28 sts)
R14 - *sc2tog, sc 5* x 4 (24 sts)
Add stuffing
R15 - *sc2tog, sc 2* x 6 (18 sts)
R16 - *sc2tog, sc* x 6 (12 sts)
R17-18 - sc around (12 sts)
DO NOT FASTEN OFF


Head
continuing from body
R19 - *2sc, sc* x 6 (18 sts)
R20 - *2sc, sc 2* x 6 (24 sts)
R21 - *2sc, sc 3* x 6 (30 sts)
Stuff the rest of the body and neck making sure to tightly stuff the neck so the head doesn't flop
R22 - *2sc, sc 4* x 6 (36 sts) 
R23 - *2sc, sc 5* x 6 (42 sts)
R24 - *2sc, sc 6* x 6 (48 sts) 
R25-34 - sc around (48 sts)
R35 - *sc2tog, sc 6* x 6 (42 sts)
R36 - *sc2tog, sc 5* x 6 (36 sts)
R37 - *sc2tog, sc 4* x 6 (30 sts)
R38 - *sc2tog, sc 3* x 6 (24 sts)
R39 - *sc2tog, sc 2* x 6 (18 sts)
Add stuffing
R40 - *sc2tog, sc* x 6 (12 sts)
R41 - sc2tog x 6 (6 sts)
Fasten off


Arms
ch 2
R1 - sc 6
R2 - *2sc, sc* x 3 (9 sts)
R3 - *2sc, sc 2* x 3 (12 sts)
R4 - *2sc, sc 2* x 4 (16 sts)
R5-7 - sc around (16 sts)
R8 - *sc2tog, sc 2* x 4 (12 sts)
R9 - sc around (12 sts)
Add stuffing here and then every few rounds to make it a little easier to stuff
R10 - *sc2tog, sc 2* x 3 (9 sts)
R11-21 - sc around (9 sts)
R22 - hdc 4, sc, sl st
Fasten off, leave long tail for sewing to body

Sew arms to body


This is the main pattern for the mermaid. For the rest, hair, face features, I know most people have their preferences for how they do them. If you are new to amigurumi, or just like to try different things, here is what I did.

For the hair I followed this hair tutorial from EssHaych. It is a little time consuming, but if you want long flowing hair (and what mermaid doesn't?), this is a great way to do it.


For the eyes I used embroidery thread and made a two round circle of 6 then 12 sc. After I sewed them on to the face I stitched a couple eyelashes on.

For the mouth I used embroidery thread as well and just made a couple stitches for a little smile.


I also stitched around the loops at the top of the tail with some gold crochet thread to add a little.


I hope you enjoy making this mermaid. If you have questions or find a mistake please comment and ask or let me know.

This pattern is for personal use only. If you would like to sell a finished product, please credit me for the design. Happy Stitches!
Read More »

Monday, June 2, 2014

Dragons - Pattern

I've always enjoyed stories with magic and mythical creatures. As I got a little older I liked the idea of dragons. I still like dragons. So what better way to pass that interest on to my kids than making them dragons to play with.


I made these two with two different types of yarn. The larger blue one is made with worsted weight acrylic yarn and the smaller green one is made with a DK weight yarn that I have been wanting to try called CotLin from Knit Picks. I really enjoyed working with it. It is 70% Tanguis Cotton and 30% Linen. It is softer than 100% cotton and not prone to splitting. But back to dragons.


I actually wrote the pattern down as I was doing this guy since I knew I would need to make one for each child. In fact I really made both at the same time since I ran out of the blue after the legs. (That's what I get for using left over yarn.) So the pictures will be a mixture of both dragons.

Materials:
Worsted or DK weight yarn, two or three colors
Hook G (worsted weight) or F (DK weight)
stitch marker 
yarn needle
Stuffing of your choice

Abbreviations:
ch - chain
st(s) - stitch(es)
sl st - slip stitch
sc - single crochet
sc2tog - single crochet two together
BLO - back loop only

Note:
Done in continuous rounds, place stitch marker in the first stitch of round, moving it up each round to mark the beginning of the round

Head
using main color, ch 2
R1 -  in 2nd ch from hook, sc 6 
R2 - 2sc in each stitch (12 sts)
R3 - *sc, 2sc* x 6 (18 sts)
R4 - *sc 2, 2sc* x 6 (24 sts)
R5 - *sc 3, 2sc* x 6 (30 sts)
R6 - *sc 4, 2sc* x 6 (36 sts)
R7 - *sc 5, 2sc* x 6 (42 sts)
R8-12 - sc around (42 sts)
R13 - sc 26, ch 8 (34 sts)


R14 - sc into st with marker, place marker into that sc. sc 33 (sc in each ch st not around) (34 sts)
R15 - sc around (34 sts)
R16 - *sc2tog, sc 6* x 3, sc2tog, sc 8 (30 sts)
R17 - sc around (30 sts)
R18 - *sc 4, 2sc* x 6 (36 sts)
R19 - *sc 3, 2sc* x 9 (45 sts)
R20-22 - sc around (45 sts)
R23 - *sc2tog, sc 7* x 5 (40 sts)
R24 - *sc2tog, sc 6* x 5 (35 sts)
R25 - sc 2, *sc2tog, sc 5* x 4, sc2tog, sc 3 (30 sts)
R26 - sc2tog x 2, sc 15, sc2tog x 2, sc, sc2tog, sc, sc2tog, sc (24 sts)
R27 - sc, sc2tog, sc 13, sc2tog, sc, sc2tog, sc, sc2tog (20 sts)
R28 - *sc, sc2tog, sc* x 5 (15 sts)
R29 - *sc2tog, sc* x 5 (10 sts)
R30 - sc2tog x 5 (5 sts)
Fasten off and weave in end to close
Stuff nose and top portion of head


Neck and Body
continue using main color


R1 - join at 8th open st of head, sc in same st, sc 7, sc2tog (next sc and first ch st), sc in next 6 ch sts, sc2tog (last ch st and next sc), sc 6 (22 sts)
R2 - sc 7, sc2tog x 2, sc 4, sc2tog x 2, sc 3 (18 sts)
R3-4  - sc around (18 sts)
R5 - sc 7, 2sc, sc 6, 2sc, sc 3 (20 sts)
R6 - sc 8, 2sc, sc 7, 2sc, sc 3 (22 sts)
R7 - sc around (22 sts)
R8 - sc 10, 2sc, sc 5, 2sc, sc 5 (24 sts)
R9 - sc around (24 sts)
R10 - sc 9, *2sc, sc 2* x 5 (29 sts)
R11 - sc around (29 sts)
R12 - sc 10, *2sc, sc 3* x 4, 2sc, sc 3 (34 sts)
R13 - sc around (34 sts)
At this point you will want to stuff the rest of the head and neck. 
R14 - *2sc, sc 4* x 6, 2sc, sc 3 (41 sts)
R15 - *2sc, sc 5* x 6, 2sc, sc 4 (48 sts)
R16-19 - sc around (48 sts)
R20 - *2sc, sc 7* x 6 (54 sts)
R21-25 - sc around (54 sts)
R26 - *sc2tog, sc 7* x 6 (48 sts)
R27 - *sc2tog, sc 6* x 6 (42 sts)
R28 - *sc2tog, sc 5* x 6 (36 sts)
R29 - *sc2tog, sc 4* x 6 (30 sts)
R30 - *sc2tog, sc 3* x 6 (24 sts)
R31 - *sc2tog, sc 2* x 6 (18 sts)
Stuff the rest of the body 
R32 - *sc2tog, sc* x 6 (12 sts)
R33 - sc2tog x 6 (6 sts)
Fasten off and weave in end to close


Leg (make 2)
using accent color, ch2
R1 - in 2nd ch from hook sc 6
R2 - 2sc in each st (12 sts)
R3 - *sc, 2sc* x 6 (18 sts)
R4 - *sc 2, 2sc* x 6 (24 sts)
R5 - *sc 3, 2sc* x 6 (30 sts)
R6 - change to main color, in BLO sc around (30 sts)
R7-9 - sc around (30 sts)
R10 - *sc2tog, sc 3* x 6 (24 sts)
R11 - sc around (24 sts)
R12 - *sc2tog, sc 2* x 6 (18 sts)
R13-16 - sc around (18 sts)
R17 - *sc 2, 2sc* x 6 (24 sts)
R18 - sc 6, *2sc, sc* x 6, sc 6 (30 sts)
R19-21 - sc around (30 sts)
R22 - sc 6, *sc2tog, sc* x 6, sc 6 (24 sts)
R23 - *sc2tog, sc 2* x 6 (18 sts)
Stuff leg 
R24 - *sc2tog, sc* x 6 (12 sts)
R25 - sc2tog x 6 (6 sts)
Fasten off and weave in end to close


Arm (make 2)
using accent color, ch 2
R1 - in 2nd ch from hook sc 6
R2 - 2sc in each st (12 sts)
R3 - *sc, 2sc* x 6 (18 sts)
R4 - change to main color, in BLO sc around (18 sts)
R5-6 - sc around (18 sts)
R7 - *sc2tog, sc* x 6 (12 sts)
R8-10 - sc around (12 sts)
R11 - *sc, 2sc* x 6 (18 sts)
R12-14 - sc around (18 sts)
Stuff arm 
R15 - *sc2tog, sc* x 6 (12 sts)
R16 - sc2tog x 6 (6 sts)
Fasten off and weave in end to close


Tail
using main color, ch 2
R1 - in 2nd ch from hook, sc 4
R2 - sc, 2sc, sc, 2sc (6 sts)
R3 - *sc, 2sc* x 3 (9 sts)
R4-8 - sc around (9 sts)
R9 - *sc 2, 2sc* x 3 (12 sts)
R10-12 - sc around (12 sts)
R13 - *sc 3, 2sc* x 3 (15 sts)
R14 - sc around (15 sts)
R15 - *sc 4, 2sc* x 3 (18 sts)
R16 - sc around (18 sts)
R17 - *sc 5, 2sc* x 3 (21 sts)
R18 - *sc 6, 2sc* x 3 (24 sts)
R19 - sl st in next 3 sts to finish, leave long end for sewing to body
Stuff tail


Ear (make 2)
using main color, ch 4
R1 - in 2nd ch from hook 2sc, sc, 2sc, turn (5 sts)
R2 - ch 1, 2sc, sc 3, 2sc, turn (7 sts)
R3 - ch 1, 2sc, sc 5, 2sc, turn (9 sts)
R4 - ch 1, sc 7, 2sc, 2sc, turn (11 sts)
R5 - sl st in first sc, sl st in next sc, sc, [hdc, dc, hdc] in next sc, sc, sl st, sc, [hdc, dc, hdc] in next sc, sc, sl st, sc (15 sts)
Fasten off, leave long end for sewing to head

Wing (make 2)
ch 16
R1 - in 2nd ch from hook sc, sc 14, turn (15 sts)
R2 - ch 1, sc 12, ch 3, turn (12 sts + 3 ch)
R3 - sc in 2nd ch, sc 13, turn (14 sts)
R4 - st st 3, sc 7, ch 3, turn (10 sts + 3 ch)
R5 - sc in 2nd ch, sc 8, turn (9 sts)
R6 - sl st 2, sc 4, ch 3, turn (6 sts + 3 ch)
R7 - sc in 2nd ch, sc 4, sl st (6 sts)
Fasten off, leave long end for sewing to body

Now you have all the pieces, and it is time to start sewing them together.

First sew on the tail to the back of the dragon body, lining it up in the middle and at the bottom of the body.


 I added the ears next. Sew to the side of the head.


Next add the legs. I pressed the side of the legs against the body and sewed it on. Use pins to hold it in place if you wish, especially the second leg if you are having trouble lining the two legs up.


Next add the arms. Position the arms slightly forward and sew on.


Before adding the wings, I stitched down the middle from the top of the head to the tail with the accent color on the green dragon and with a second accent color on the blue dragon. I made the stitches three to five rows long, longer ones in the  middle and shorter ones at the top of the head and tail, with one or two rows between. This row of stitches will be used as a base for the spikes. Unfortunately I didn't get pictures of this. Although you can somewhat see part of them here.


Once I had the spike base stitched, I added the wings, again didn't get pictures (I was excited about being almost done). I sewed each wing on about a stitch or two away from the spike base.

Spikes
Now for the spikes. I made two different types of spikes. For the blue dragon I made traditional spikes by joining the second accent color to each of the spike base stitches. Sc around the yarn 4 to 10 times depending on the length of the base stitch. Turn and decrease the stitches. I did the following:

sc 4, turn                                     sc 6, turn
ch 1, sc2tog x 2, turn                ch 1, sc2tog, sc 2, sc2tog, turn
ch1, sc2tog                                 ch 1,  sc2tog x 2, turn
                                                     ch1, sc2tog

sc 8, turn                                     sc 10, turn
ch1, sc2tog x 4, turn                 ch 1, sc2tog x 2, sc 2, sc2tog x 2, turn
ch 1, sc2tog x 2, turn                ch 1, sc2tog, sc 2, sc2tog, turn
ch1, sc2tog                                  ch 1,  sc2tog x 2, turn
                                                      ch1, sc2tog


On the green dragon I made loops instead of spikes. Join the accent color to the top spike base. Sc around the yarn 4 to 10 times depending of the length of the base stitch. Once you get to the end of the stitch ch 3 and sc around the next base stitch, continue to sc around each base stitch with a ch 3 between each until you reach the end of the tail. Turn and begin making the loops by chaining 4 to 10 sts at each sc section of the previous row then sc 4 around each ch space of the previous row, sl st into the last sc of the previous row to finish. The more ch sts the bigger the loops will be. I started and ended with smaller loops and made larger loops in the middle.


Okay, now for the fun part, embellishments. Of course you want to add eyes, I added nostrils. Then some stitching along the top of the ears.


On the wings I slip stitched along the top of one dragon and sc along the top of the other. I added stitching between rows on the belly. If you want to do more or less use your imagination.


I hope you have fun making these. If you have questions or find a mistake please comment and ask or let me know.

This pattern is for personal use only. If you would like to sell a finished product, please credit me for the design. Happy Stitches!

Read More »

Printfriendly